The ABAP RESTful Application Programming Model (RAP) is revolutionizing how we build applications in SAP, especially for transactional scenarios. Moving beyond read-only reports, creating robust transactional applications is a core capability of RAP. This blog post, based on a recent insightful video, will walk you through the initial steps of developing your first Managed ABAP RAP application, focusing on the crucial architectural decisions and foundational data modeling.
Managed vs. Unmanaged RAP: Choosing Your Path
Before diving into development, it’s essential to understand the two main approaches in RAP for transactional applications:
- Managed RAP Application: This is where the RAP framework truly shines by taking over much of the heavy lifting. The framework handles the runtime implementation, including complex aspects like transactional buffering, lock management, and save sequences. As a developer, your primary focus is defining the business behavior (CREATE, UPDATE, DELETE, custom actions, and draft handling) using the Business Definition Language (BDL).
- When to use Managed RAP: It’s ideal for Greenfield implementations – entirely new developments where there’s no existing legacy code, complex lock objects, or standard function modules for data updates that need to be reused.
- Unmanaged RAP Application: In contrast, an unmanaged scenario is chosen when you need to integrate with or reuse existing functionalities. If you have legacy code, standard function modules (like BAPIs), or other pre-existing logic that performs updates, you’ll opt for an unmanaged scenario and implement the save sequence yourself.
This guide focuses on the simpler, yet incredibly powerful, Managed RAP Application approach, perfect for new developments.
Designing Your Managed RAP Application: The Travel Provider Case Study
To illustrate the process, we’ll consider a practical example: a Travel Provider application. This application is designed to allow users to book flights on behalf of customers.
The application envisions two key roles:
- Processor: Responsible for creating and managing flight bookings.
- Approver: Responsible for reviewing and approving these bookings.
Laying the Foundation: The RAP Data Model & Composition
A well-structured data model is the backbone of any robust RAP application. For our travel provider application, we’ll establish a hierarchical data model using a composition relationship between three main entities:
- Travel: This will serve as our root entity, representing the main travel booking.
- Booking: This entity will be a child of Travel, holding details for individual flight bookings within a travel.
- Booking Supplement: This entity will be a child of Booking, capturing additional services or supplements for a specific booking (e.g., extra baggage, special meals).
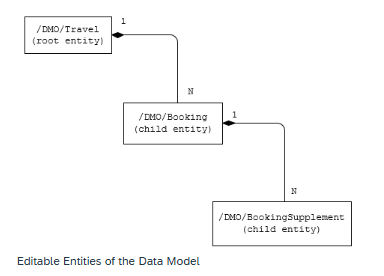
The composition relationship signifies a strong dependency, meaning a Booking cannot exist without a Travel, and a Booking Supplement cannot exist without a Booking.
From Tables to CDS: Building the Root Entity
The development process for our managed RAP application begins with defining the underlying database structure and then building the CDS (Core Data Services) interface views on top.
- Building the Root Entity’s CDS Interface View: Next, we create the root entity’s CDS interface view (e.g., Z_I_TRAVEL_M) on top of the /DMO/Travel database table. This CDS view will be the primary access point for our Travel Business Object.
- Build interface views on top of /DMO/Booking and /DMO/Bookingsupplement in same way.
Enriching Your Data: Associations and Annotations
To make your CDS view functional and user-friendly, you’ll enrich it with associations and annotations:
- Associations to Master Data: Associate your root entity with relevant master data entities (e.g., Agency, Customer, Currency). This allows you to pull in descriptive texts and other critical information directly into your view, rather than just IDs.
- Annotations for Semantics & UI:
- Use sematic annotations (e.g.,
@Semantics.textfor text fields,@Semantics.currency.currencyCodefor currency codes) to provide meaning to your data, which is crucial for SAP Fiori Elements to display information correctly. - Employ search annotations (e.g.,
@Search.searchable) to enable full-text search capabilities on relevant fields. - Define value help annotations to provide F4 help for fields linked to master data.
- Use sematic annotations (e.g.,
Successfully activating your root CDS entity marks a significant milestone, setting the stage for defining behavior and building the UI in subsequent steps.
Your Journey to a Fully Managed RAP Application
Embarking on Managed ABAP RAP application development opens up new possibilities for efficient and robust solutions in SAP. By carefully structuring your data model, leveraging the power of CDS views with associations and annotations, and understanding the framework’s handling of transactional processes, you’re well on your way to building powerful SAP Fiori applications.
Stay tuned for the next parts of this series, where we’ll delve deeper into defining behavior and building the UI!
Also comment if you would like code snippets and a more detailed version of this blog.
Also Read – Mastering ABAP RAP : Business Service Provisioning & Consumption
Hi, yes i would like to see the coding part too. Thanks